Pages

As for me and my blog, we will serve the Lord.


Tuesday, January 31, 2012

Altered Clipboard + Inspiration

IMG_1058 Okay, I AM just a scrapbooker, but I guess I must admit to playing around a bit with “altered art,” although I still cannot think of anything I do as “art.” I was intrigued by a fellow ATT member’s altered clipboard and decided to try something similar.

Inspired by a book we are studying in our small group, The Me I Want to Be by John Ortberg, I have come to love the word “flourish.” Ortberg says that “flourishing means moving toward God’s best version of you” and he contrasts flourishing with languishing (none of us wants to do that!). I love the passage in Psalm 92:12-13: “The righteous will flourish like a palm tree….they will flourish in the courts of our God.” So, that was the “theme thought” I had in mind as I bought the $1.99 wooden clipboard and pulled some ideas out of the air.

I removed the metal clamp and primed the front of the clipboard with gesso. After it dried, needing a break from my fall and holiday project colors, I just started grabbing some Distress Ink pads that fit my mood that day (Broken China, Dusty Concord, Wild Honey and Faded Jeans). I just inked as the fancy hit me. After it dried, I pulled out some stamps that fit my thoughts and created a “stamp collage,” using Archival Black Ink for all the stamping.

I cut my theme word, FLOURISH, from cereal box, using the Storybook font, with the Cricut. I then cut the very same letters from a beautiful paper from Tim’s Lost and Found Paper Stash (found one that fit the ink colors I had chosen) and glued them to the cereal box letters. Then I covered all the letters with Clear Rock Candy Distress Crackle Paint, let dry, and then inked edges with Black Soot. I adhered them to the clipboard with Glossy Accents.

I had fun with the little embellies I attached through the hole in the metal clamp. I had two items to color with Alcohol Inks: the little chain (it was attached to a box of chipboard letters I bought about 4 years ago, and it was light green) and the large pearl bauble (from Tim). I mixed Wild Plum and Denim inks in a little zip-loc bag, to get just the shade of purple I wanted (to match the Dusty Concord distress ink).

I used Cricut Craft Room to weld the letters for the word GROW and then cut from grungeboard (yes, I use the Cricut to cut grungeboard). I then inked it with Dusty Concord, inked the edges with Black Soot, and covered it all with Clear Rock Candy Crackle Paint. I added another little bauble I had in my findings. I glued on a flower in keeping with the theme of flourishing and growing.

clipboard and book

My little white mini-legal pads that I love to use will fit just right, and I will be taking the clipboard with me to small group tonight!

Sunday, January 29, 2012

Valentine Tag for Scrapbook

tag from phone ed in pixlr Inspired by a project created by Shelly Hickox, I made a tag to use on the scrapbook page I will put together, with the photos posted earlier in “Cupcakes with Tory.” The Festive Berries Distress Ink exactly matches our frosting color!

I used a Cuttlebug folder to emboss the manila tag. Then I inked it lightly with Festive Berries Distress Ink. The cupid and heart are from Tim’s mini Love Struck set.

My least favorite thing to work with is glitter, and I should’ve stuck to my guns on that one. Not only is it a huge mess, but it never photographs nicely. I used Martha Stewart yellow gold glitter on the cupid, and on the heart I used her crystal coarse glitter.

The flourishes are cut from grunge paper, using Tim’s mini flourish die (love this one). Two of them I painted with the black paint dabber, and the other I painted with the Red Pepper dabber. I sanded them lightly after painting.

The trim at the bottom is colored with Festive Berries, and the ribbon at the top with Black Soot (both were originally white). I used music tissue paper and tissue tape behind the cupid. I sprayed the entire tag lightly with Heirloom Gold Perfect Pearls mist and then inked the edges of the tag with Black Soot.

The paper from Tim’s seasonal stash (behind the tag) will become the background paper on the scrapbook page. The sheet music is from my library (used many times through the years to play for weddings).

I am quite enjoying creating my own detailed embellishments for some of my scrapbook pages.

Monday, January 23, 2012

Second Smash Journal

Just bought a second journal, this one to use primarily for saving ideas for projects. I grunged it up a bit.

new smash journal

Friday, January 20, 2012

Tag for Opening Page of 2012 Scrapbook

New Year_s Tag

This tag was inspired by a beautiful New Year’s tag shared by Anita Houston.

Starting with a #8 manila tag, I sprayed it with Tattered Angels Glimmer Mist, Glacier (have had on hand for years but never used). After drying, I inked with Iced Spruce and Broken China distress inks. I stamped a few of Tim Holtz’s clocks and then heat embossed with white powder. I found some old transparencies for laser printers (from my teaching days) and printed a scanned copy of my music for “Auld Lang Syne” onto the transparency and adhered with staples. The sentiment is from one of Tim’s stamp sets. The border is cut with the Vintage Lace die on metal tape. The “ribbon” is twill tape, inked with Iced Spruce. I finished off with some metal embellishments and flourishes from my ever-growing supply of TH goodies.

Since most of my tags make their way onto scrapbook pages, I must be careful about being too “dimensional.” I think this one will work just fine!

Wednesday, January 18, 2012

Scrapbooks Caught Up!! Yay!!

2011 albums b

I scrapbook everything, and I take lots of pictures. So it’s necessary that I stay caught up, or I may never see the light of day. As of today, I finished 2011: two full Creative Memories 12x12’s and one 12x12 of our vacation. As an aside, I also have mostly filled my first Smash Journal—and my Prayer Journal is bulging this year as well! I was running a bit behind as of December, having joined the craze of learning and using Tim Holtz techniques (I even completed the 12 Tags of Christmas!!).

It’s a good feeling to be caught up! – Well, actually, I have three pictures ready for go for 2012, and the new CM albums should arrive tomorrow!

Monday, January 16, 2012

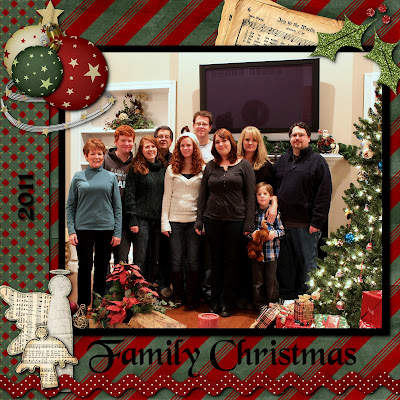
Family Christmas Digital Page

Most of my scrapbooks are traditional, paper. Occasionally I throw in a digital page, to put in a special album just for digital experiments.

Timeless Memories Scrapbook Layout

IMG_1018

Left side of 2-page 12x12 layout

IMG_1008

Right side of 2-page 12x12 layout

As threatened, I finally completed the two-page layout using my Christmas pictures of singing around the piano, and incorporating a photo from 1980. I LOVE the pages, but it is SO frustrating to try to capture the “real” look in photographs! I have a great camera, but I just can’t capture the real thing. For example, the black behind the tag and the old photo is tissue paper (that happened to come in some packaging in the mail that day)—and the colors of the photos on the left side are not true, (they are much brighter in life), but changing those with editing software makes the background paper (Tim Holtz tissue paper) not a true color. Oh, well, the main purpose of the layout is NOT to take pictures of the layout!

For both pages, I first adhered plain white cardstock to my Creative Memories page (I use the spargo pages). Then I spread Studio matte glue all over the cardstock and scrunched up the music tissue paper. After stacking books on it as it dried, I then spread Picket Fence Stickles over the entire page. I gathered some tulle behind the old photo, giving it a rather “airy” look (in real-life).

This is much more “dimensional” than most of my pages—otherwise, I would never get an entire year in two 12x12’s, and that’s my goal this year.

Tuesday, January 10, 2012

“Hark” Tag for Scrapbook Page

I am in a holding pattern for scrapping my Christmas pictures, because I ordered the prints from Snapfish, and once again, the order is lost somewhere and not in my hands, after 12 days. Ugh!

But I have been working on a tag to use on one of the layouts, once the prints do arrive. I finished the tag today. It is based on one of this year’s 12 Tags of Christmas (Tim Holtz). The challenge for a scrapbook page will be to “smoosh” the tissue paper flower!

Hark Tag for Piano Singing Page

Friday, January 6, 2012

Scrapbook Layout-Alyssa’s Christmas Madrigal

Madrigal Layout Left Side ed Picasa

Left side of 12x12 two-page Layout

Madrigal Layout Right Side ed Picasa

Right side of 12x12 two-page Layout

Since the setting of the Christmas Madrigal was Medieval England, the vintage style seemed very natural for this layout (not that “vintage” and “medieval” are the same, but closer than contemporary and medieval!). I used paper from Tim’s Lost and Found stash, and it was handy to have a 6x6 portion of the music page to put onto a tag. I love the Christmas lamppost, and it was fun to incorporate it into this project.

There are more and larger pictures from the event in an earlier post, but I wanted to post this layout as a part of my journey to incorporate more creativity (via vintage techniques, for one thing) into my pages.

Our beautiful granddaughter Alyssa is the STAR of this layout! Can’t believe she is a senior, and this was her last Madrigal!

Wednesday, January 4, 2012

Scrapbook Layout-Conner’s Christmas Concert

SB Layout Conner's Winter Concert 2011

Inspired by Tag #2 of this year’s 12 Tags of Christmas, this layout provided the opportunity to experiment with bringing in “tag” elements and techniques onto a scrapbook layout. I used some of the beautiful music paper in the Tim Holtz Christmas Memories Kraft Resist Stash. Challenging it is, to get 7 photos on a two-page layout, and still leave room for some embellishments.

The photos for this layout are included in an earlier blog post. We were so proud of Conner, as he is in the top audition choir at his large high school, as a sophomore!